|
| Screenshot Numbered Page Navigation |
Tutorial:
1. Login ke Dashboard blogger.
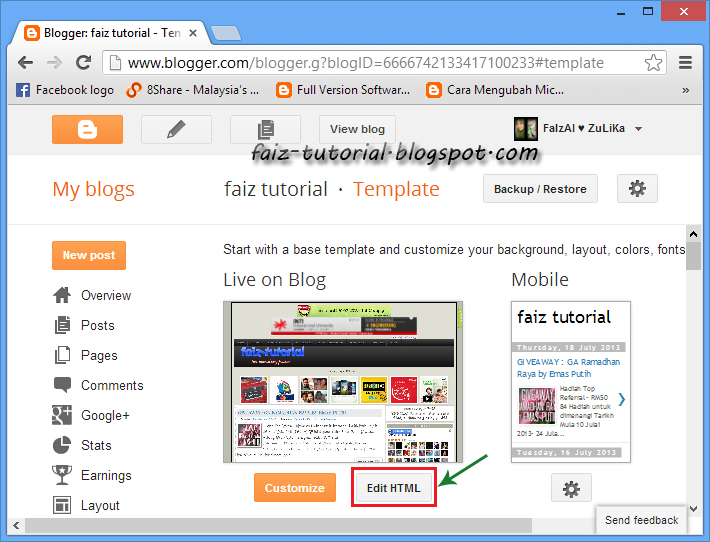
2. Klik butang " More Options (rujuk no 1 pada GAMBAR 1) " dan klik " Layout (rujuk no 2 pada GAMBAR 1) ".
 |
| GAMBAR 1 |
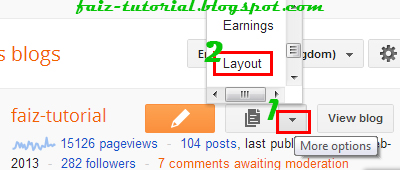
3. Pada halaman Layout, klik " Add a Gadget (rujuk no 3 pada GAMBAR 2) " pada mana-mana bahagian yang anda nak untuk letakkan kod javascript tu nanti.
 |
| GAMBAR 2 |
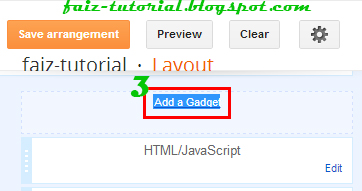
4. Cari HTML/Javascript dan klik butang tambah (rujuk no 4 pada GAMBAR 3).
 |
| GAMBAR 3 |
5. Copy (CTRL+C) kod javascript dibawah:
<style type="text/css">
.blog-pager,#blog-pager{
font-family:arial, serif;
font-weight:bold;
font-size:12px;
width:98%;}
.showpageNum a,.showpage a {
background:transparent url(https://blogger.googleusercontent.com/img/b/R29vZ2xl/AVvXsEgw4PqEf-jN3X-K7Yw9NZeqAXkvAv3ISRlzvGBFRPLl29i750BbqMXI3WozlGHZdxNdjznwkkAmRjbA4sZCT64pZZw-aQWIGcqfhyphenhyphenAPau41GIIBt9T1-ibUsap7hOLOyPajh0WBsrXNHBE/s1600/lite.png) repeat-x;
background-position:0px -0px;
border:2px solid #555;
-webkit-border-radius:3px;
-moz-border-radius:3px;
border-radius:3px;
margin:0px 1px 0 1px;
padding:3px 10px;
color:#222;
line-height:30px;
cursor:pointer;}
.showpageNum a:hover,.showpage a:hover {
background-image:url(https://blogger.googleusercontent.com/img/b/R29vZ2xl/AVvXsEgw4PqEf-jN3X-K7Yw9NZeqAXkvAv3ISRlzvGBFRPLl29i750BbqMXI3WozlGHZdxNdjznwkkAmRjbA4sZCT64pZZw-aQWIGcqfhyphenhyphenAPau41GIIBt9T1-ibUsap7hOLOyPajh0WBsrXNHBE/s1600/lite.png) repeat-x;
background-position:0px -30px;
border:2px solid #555;
-webkit-border-radius:3px;
-moz-border-radius:3px;
border-radius:3px;
color:#111;
-text-decoration:underline;}
.showpageOf{
margin:0 8px 0 0;
background:transparent url(https://blogger.googleusercontent.com/img/b/R29vZ2xl/AVvXsEgw4PqEf-jN3X-K7Yw9NZeqAXkvAv3ISRlzvGBFRPLl29i750BbqMXI3WozlGHZdxNdjznwkkAmRjbA4sZCT64pZZw-aQWIGcqfhyphenhyphenAPau41GIIBt9T1-ibUsap7hOLOyPajh0WBsrXNHBE/s1600/lite.png) repeat-x;
background-position:0px -0px;
border:2px solid #555;
-webkit-border-radius:3px;
-moz-border-radius:3px;
border-radius:3px;
line-height:30px;
padding:3px 10px;
color:#222;}
.showpagePoint {background:transparent url(https://blogger.googleusercontent.com/img/b/R29vZ2xl/AVvXsEgw4PqEf-jN3X-K7Yw9NZeqAXkvAv3ISRlzvGBFRPLl29i750BbqMXI3WozlGHZdxNdjznwkkAmRjbA4sZCT64pZZw-aQWIGcqfhyphenhyphenAPau41GIIBt9T1-ibUsap7hOLOyPajh0WBsrXNHBE/s1600/lite.png) repeat-x;
background-position:0px -30px;
margin:0 3px 0 3px;
padding:3px 10px;
line-height:30px;
cursor:pointer;
white-space:nowrap;
border:2px solid #111;
-webkit-border-radius:3px;
-moz-border-radius:3px;
border-radius:3px;
color:#777;
text-decoration:underline;
font-weight:bold;
</style>
<script type='text/javascript'>
//<![CDATA[
var postperpage=6;
var numshowpage=4;
var upPageWord ='« Prev ';
var downPageWord ='Next »';
var urlactivepage=location.href;
var home_page="/";
//]]>
</script>
<script type='text/javascript'src='https://dl.dropboxusercontent.com/s/msf4tmk4gr7gzs9/navipage-faiz-tutorial.js'></script>
Keterangan:- var postperpage=6; - Gantikan nilai 6 dengan bilangan entri pada setiap halaman.
- var numshowpage=4; - Gantikan nilai 4 dengan bilangan number navigation yang akan dipaparkan.
6. Paste (
CTRL+V) pada ruang Content (
rujuk no 5 pada GAMBAR 4)
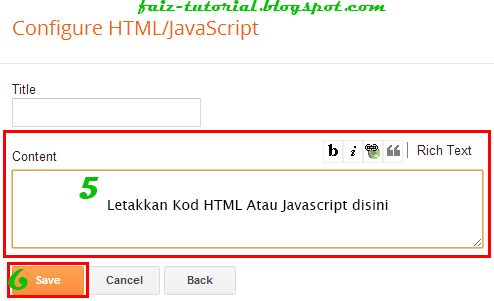 |
| GAMBAR 4 |
7. Seterusnya klik " Save (rujuk no 6 pada GAMBAR 4 ) " dan lihat la hasilnya